Make Your Own Invitations

Having a party? You can get pre-made invitations at the store and write in the pertinent information or have them custom printed, but if you really want to add a personal feel to your invitations, make your own. With a little computer know how, it isn’t hard to do.
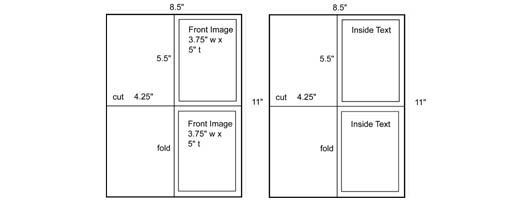
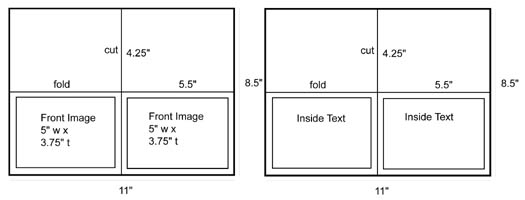
For simple and inexpensive invitations, design your card to take up half of an 8 ½” x 11” sheet of paper. You can then print two cards at a time, cut the sheet in half, then fold the cards. The finished cards will measure 4.25”x5.5” and fit nicely into an A-2 envelope.
Decide whether you want your card to be vertical or horizontal. Using a layout or photo program, place your images and text as shown in the diagrams below. You can add additional photos or information if you like on inside and back of the card. A map is often a helpful addition.
Vertical Cards:

Horizontal Cards:

When you finish designing your card, print a copy. Be sure the back and front line up correctly and that you like the result. Once you are happy with your card, you are ready to print the finished product. You can do this yourself or go to a copy store.
Since people have different software on their computers, specific instructions for designing the card on your computer are not included here. However, if you are not good with computers, you can also put together your invitation by hand, cutting out photos and using glue or double-sided tape to attach them to the paper. You can either hand letter your card or print your text and glue it in place as well. Take your finished prototype to the copy store to have copies made to send out. Be sure to check the first copy to make sure that it is as you like it. If there are problem spots, use white-out on the copy and copy from the corrected copy for additional cards. Do not have the bulk of the invitations made until you are happy with your results.
Pick a card stock paper you like for your invitation. For a home printer, you will want to pick a light weight card stock and make sure your printer is able to handle the thickness. A white card stock with a smooth finish is usually a good choice, though there are times when colored papers and textured papers are appropriate. If there is a store in your area that sells a variety of papers and envelopes, look at your options before making a decision. If you are having copies made at the copy store, check to make sure they will accept outside papers, and if they will not, chose from their selection. While you are choosing your paper, pick a matching envelope as well.
Once your cards have been printed, use a paper cutter, an exacto knife, or scissors to cut the cards and fold the folded side by hand. Be careful as it is very easy to accidentally cut the wrong side.
You can use your word program to make address labels or address the cards by hand. If you want to put together an RSVP card, you can do that as well. You can make the RSVP card self mailing, like a post card or you can purchase smaller envelopes and fit it to size. Depending on the event, you may include return postage as well.
If making your own invitations proves too challenging or time consuming, many stores offer photo cards. You can also have your card custom designed by a professional designer, a copy or print shop, an artist or a design student. The options are only limited by your imagination and your budget.


